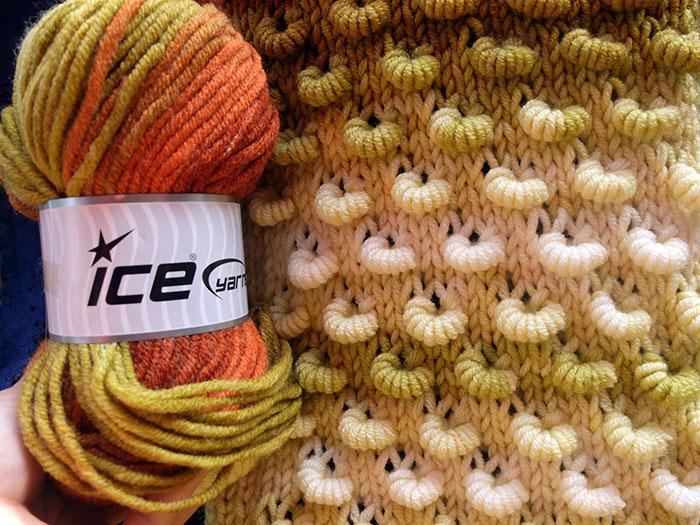
If you're looking for a project that can help you relax while also resulting in a one-of-a-kind accessory, consider knitting the Helical stitch scarf. It provides a satisfying creative outlet and can alleviate stress and tension.

ABBREVIATIONS
RS, WS: right side, wrong side.St (sts): stitch (stitches).
K: knit.
P: purl.
Kfb: Knit front and back.
K2tog: knit 2 sts together.
Here's how to make the Helical Spring stitch:
- Take the yarn to the back of the work.
- Insert the right-hand needle into the next stitch on the left-hand needle.
- Wrap the yarn around both needles for 10 times. Use the tip of your right thumb to grip yarn.
- Knit the stitch as normal, then carefully pull the new stitch through the loops.
- Gently pull on the working yarn to coil the loops up close to the needle.

To get started, you'll need bulky yarn and the right knitting needles for the yarn. Once you have those, cast on 41 stitches to begin your scarf.
The pattern includes 12 stitches for a rib stitch border, but this may cause the scarf to curl. Therefore, you may want to consider replacing the rib stitch with another stitch to prevent this issue.
The pattern includes 12 stitches for a rib stitch border, but this may cause the scarf to curl. Therefore, you may want to consider replacing the rib stitch with another stitch to prevent this issue.
Rib stitch border
Row 1 (RS): K1, (p1, k1) ×20.
Row 2 (WS): P1, (k1, p1) ×20.
Row 3-10: Repeat rows 1-2.
Decrease 41 stitches to 36 stitches
Row 11: K1, p1, k1, p1, k1, p1, k2, ( k2tog, k4) x4, k2tog, k1, p1, k1, p1, k1, p1, k1.
Row 12: P1, k1, p1, k1, p1, k1, p24, k1, p1, k1, p1, k1, p1.
Row 17: k1, p1, k1, p1, k1, p1, k24, p1, k1, p1, k1, p1, k1.
Row 18: p1, k1, p1, k1, p1, k1, p2, (pfb, p4) x4, pkb, p1, k1, p1, k1, p1, k1, p1.
Rib stitch border
Then bind off loosely, weave in ends.
Row 1 (RS): K1, (p1, k1) ×20.
Row 2 (WS): P1, (k1, p1) ×20.
Row 3-10: Repeat rows 1-2.
Decrease 41 stitches to 36 stitches
Row 11: K1, p1, k1, p1, k1, p1, k2, ( k2tog, k4) x4, k2tog, k1, p1, k1, p1, k1, p1, k1.
Row 12: P1, k1, p1, k1, p1, k1, p24, k1, p1, k1, p1, k1, p1.
Main pattern
Row 13: K1, p1, k1, p1, k1, p1, k24, p1, k1, p1, k1, p1, k1.
Row 14: P1, k1, p1, k1, p1, k1, p1, (make Helical Spring st, knit 1, purl 2) ×5, make Helical Spring st, k1, p1, k1, p1, k1, p1, k1, p1.
Row 15: K1, p1, k1, p1, k1, p1, k24, p1, k1, p1, k1, p1, k1.
Row 16: P1, k1, p1, k1, p1, k1, p3, (make Helical Spring st, knit 1, purl 2) ×4, make Helical Spring st, k1, p3, k1, p1, k1, p1, k1, p1.
Repeat rows 13-16 until you reach desired length.
Increase 36 stitches to 41 stitchesRow 13: K1, p1, k1, p1, k1, p1, k24, p1, k1, p1, k1, p1, k1.
Row 14: P1, k1, p1, k1, p1, k1, p1, (make Helical Spring st, knit 1, purl 2) ×5, make Helical Spring st, k1, p1, k1, p1, k1, p1, k1, p1.
Row 15: K1, p1, k1, p1, k1, p1, k24, p1, k1, p1, k1, p1, k1.
Row 16: P1, k1, p1, k1, p1, k1, p3, (make Helical Spring st, knit 1, purl 2) ×4, make Helical Spring st, k1, p3, k1, p1, k1, p1, k1, p1.
Repeat rows 13-16 until you reach desired length.
Row 17: k1, p1, k1, p1, k1, p1, k24, p1, k1, p1, k1, p1, k1.
Row 18: p1, k1, p1, k1, p1, k1, p2, (pfb, p4) x4, pkb, p1, k1, p1, k1, p1, k1, p1.
Rib stitch border
Then bind off loosely, weave in ends.


