Helical Spring stitch

The Helical Spring stitch is a fascinating knitting technique that results in a coiled effect that resembles a helical spring.

Helical Spring stitch is a fascinating knitting technique that results in a coiled effect that resembles a helical spring. While this stitch may appear complex and time-consuming, the final result is well worth the effort.

I have created step-by-step instructions accompanied by pictures and video tutorials to assist you in learning how to knit the Helical Spring stitch. With practice and patience, you'll be able to create stunning projects that showcase the coiled effect of the Helical Spring stitch.
To make the HELICAL SPRING stitch, follow these steps:
  1. Bring the yarn to the back of the work.
  2. Insert the right-hand needle into the next stitch on the left-hand needle.
  3. Wrap the yarn around both needles for 10 times. Use the tip of your right thumb to grip yarn.
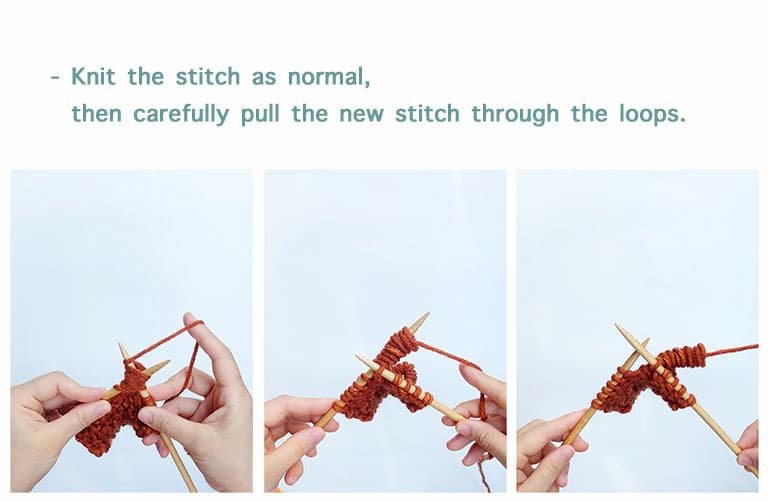
  4. Knit the stitch as normal, then carefully pull the new stitch through the loops.
  5. Gently pull on the working yarn to coil the loops up close to the needle.
Watch short video on how to make Helical Spring st
Begin by inserting the right-hand needle into the next stitch on the left-hand needle.
Wrap the yarn around both needles for 10 times.
Proceed to knit the stitch normally, then pull the new stitch out through these loops.
Gently tug on the working yarn to coil the wraps up close to the needle.
The Helical Spring stitch creates a beautiful spiral effect that is perfect for adding texture and interest to your knitting projects.
The Helical Spring stitch creates a stunning effect that is sure to impress, making it a great choice for statement pieces such as scarves, hats, and even sweaters. Whether you are an experienced knitter or just starting out, the Helical Spring stitch is a fantastic technique to add to your repertoire.
PATTERN
Cast on a multiple of 4 stitches.

Row 1: Knit.
Row 2: Purl.
Row 3; Knit.
Row 4: Purl 1, * Helical Spring stitch, knit 1, purl 2; repeat from * to last last 3 sts, Helical Spring stitch, knit 1, purl 1.
Row 5: Knit.
Row 6: Purl 3; * Helical Spring stitch, knit 1, purl 2; repeat from * to last last 5 sts, Helical Spring stitch, knit 1, purl 3.
Repeat rows 3-6.

Post a Comment

13 Comments

  1. I love this stitch. Totally disagree with the statement that you are unskilled knitter. I would say you are very skilled and highly creative. Similar to bullion stitch of embroidery and crochet. Would love to knit it as a cowl if I can figure out how to work it in the round. Thanks again for sharing this very creative stitch pattern!

    ReplyDelete
  2. whem to work in the round please

    ReplyDelete
    Replies
    1. I'm sorry I can't find a way to knit it in the round

      Delete
  3. I reckon that if you want to knit in the round, you'll knit it inside out, making all the knit town purl rows- then turn it right-side out when you're done :)

    ReplyDelete
  4. Interesting stitch! Would like to make a blanket out of it!! Can a border be added to it?

    ReplyDelete
    Replies
    1. Hi. You can cast on a multiple of 4 sts plus edge stitches for the moss stitch/garter stitch border. It will take a lot of time to complete.

      Delete
  5. bellissimo lavoro, brava ciao.

    ReplyDelete
  6. ESTA PRECIOSO EL PUNTO, SOLAMENTE NECESITO SABER CON CUANTOS PUNTOS SE COMIENZAN. GRACIAS

    ReplyDelete
  7. Beautiful stitch especially for a blanket...

    ReplyDelete
  8. Lovely, THANK YOU for sharing, will try in a few days. Happy Easter to you.

    ReplyDelete
  9. Bellรญsimo !!!!!

    ReplyDelete
  10. I've tried to knit this about 3 or 4 times and when I get to row 6 I always have an extra stitch. I'm not sure what I'm doing wrong, I guess I'll just try again and pay close attention. This is a really awesome pattern and I hope I can get it down.

    ReplyDelete